Tuesday 28 May 2013

Iron Man IV - Installation guide (based on last version)

Last version of Iron Man IV may need some different steps to be installed, i will describe the installation step by step here.


*** BEFORE TRY THIS MOD ***

1-Make sure that you have at least GTA patch 1.0.4.0 installed

2- Make sure that you have the following installed:

and maybe:

3- Make sure that you can load .Net Scripthook scripts or you will not be able to run this mod :(

*** o.O ***


Installing the basic

1-Download the main mod here
2-Extract all files to an folder (you may need WinRar to extract), you will have this files:


3-Copy all files to your GTAIV.exe folder (or EFLC.exe folder if you are installing in EFLC) and overwrite everything (files and folders):


Now let's see if the script is loading, open the game and press " (or for some keyboards ~) an black window should appear, the text "Iron Man IV script loaded" should appear:


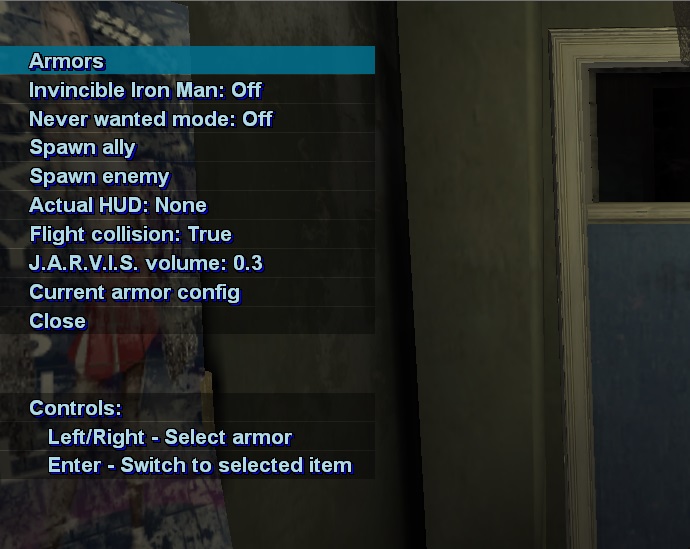
Press Esc to close the console window then press number 0 (not the numpad0) an menu should appear at left top corner:


If you can see the mod menu we can proceed with the installation of the other mod parts, if not let's see what can be wrong:

Game crash and/or closes at loading screen:
  • This can happen if you are using patch 1.0.4.0, in this case you need to copy ScriptHook.dll from folder "DLL for 1.0.4.0" to your gtaiv.exe folder and overwrite the old one.
  • Or this can happen if you forget to copy Microsoft.Xna.Framework or NAudio dll to gtaiv.exe folder.
Game opens but when you press " or ~ no black window appears:
  • Your ASI loader or Scripthook is not loading :(, i cant help you in this case, you need to find out why this is happening, maybe you need another version of ASI loader or scripthook.
Game loads but the message: "Error in script 'Iron Man'" appears at left top corner:
  • This can happen in result of incompatibility with other mods, press " and type the command reloadscripts, if error happens again you can try to temporary remove other mods and test.
  • For some reason you computer can have some kind of incompatibility with XNA Dll, in this case you can try the Iron Man.net.dll file from folder "no XBox 360 Control support version", paste it on Scripts folder and overwrite the old one.
Getting this error message when launching the game:


Probably related to Administrator rights.
  • Solution one: Right click game icon and click in Run as Administrator
  • Solution two: Download this file and put inside GTAIV.exe folder (or EFLC.exe folder)
Source of those last two solutions: http://www.gtaforums.com/index.php?showtopic=400482


Installing the animations (EFLC don't need this step)

1-First of all, close the game ^^
2-Open the OpenIV, choose Grand Theft Auto IV, open the folder anim, open the file anim.img then click in Edit mode:


3-You can drag and drop the file parachute.wad from Animation folder or use the OpenIV menu Edit > Add:


*If you can't install the animations in GTA IV using OpenIV, you can try replacing original game anims with this one, please, rename the original to something like anims.img.original before replacing :)
(press ctrl+s to download the file):


The anims.img folder commonly is: C:\Program Files\Rockstar Games\Grand Theft Auto IV\pc\anim
Always change game files with game closed.


Installing the armors

Now we will install the armors, you have two indicated options now, one is use the add peds method of the all-in-one pack or use the replace mission characters method, i recommend the second.

Let's say that you choose the replace method:

Close the game first :)

1-Download it here
2-Extract all files to an folder, you will have this:


3-Open the folder "armors (replacing mission char.)" then open the folder "to drag to Iron Man IV Armors folder", select all files right click them and Copy:


4-Open your Iron Man Armors folder (created at gtaiv.exe folder on first steps) delete everything that can be there and paste the previous copied files:


5-Now open the folder "to drag to componentPeds.img with OpenIV" we will insert those files using OpenIV. Open the OpenIV, choose Grand Theft Auto IV, open the folder models, then folder cdimages then open file componentpeds.img, click in Edit mode:


6-Now you can drag and drop all the files from the folder "to drag to componentPeds.img with OpenIV" or use the OpenIV menu Edit > Add and select all files:


The OpenIV will freeze for some seconds, it's normal.


The main armor (MK III) will replace the player, with this pack you have two options:
  • One to replace player but keep player original visual
  • And one to replace player and replace Niko's head with Tony Stark's head


Choose the one that you want, open the OpenIV and open the folders models\cdimages, now use the menu Edit > Add and select the desired playerped.rpf (or drag and drop the chosen playerped.rpf file). Don't forget to enable the Edit mode


Done! Everything is installed, open the game and try to equip each armor to see if they work fine.

Iron Man IV - Armor pack to replace mission chars

This armor pack has been setup to replace mission chars, this will avoid the add peds method side effects/"crashes".

So if your game crash when you select an added armor or your EFLC not even opens, you should try this method :)

Remember: This will replace some missions characters.

How to install:
  • Download it here
  • Extract all files to an folder:
  • If you have the armor pack with added peds method you should copy the provided peds.ide and pedVariations.dat to your "C:\Program Files\Rockstar Games\Grand Theft Auto IV\common\data" (or the proper EFLC folders) and overwrite to restore the original ped config
  • Now using OpenIV, open componentpeds.img (models\cdimages) and replace the mission chars with the provided files, also you need to delete the old im_* files from old added armors, remember to enable the "Edit mode":
  • Last step is copy content of the armor config folder to your Iron Man IV Armors folder:


Done! Now open the game and see if each armor in menu it's working fine :)

Armors by H1Vltg3Wapeddell and Quechus13

Download the updated v1.1 script here
Check how to install version v1.1 or v1.2 here
Check the new armors post here

Saturday 25 May 2013

Iron Man IV - The All-in-one Armor pack (installation and fix)

***
This method works but have some side effects:

  • Don't work fine in EFLC
  • Causes bugs with interactive points like internet cafe
  • For some people it result in clean streets with no peds or moving cars
  • And for some it just wont work because game crash when select armor


Because of this i recommend the pack that uses replace method, it will replace mission characters. Check this tutorial and download the pack here.

If you tried this pack and want to try the replace method you need to restore your peds.ide and pedVariations.dat, i provide the original for GTA IV and EFLC on the tutorial above.

***


They (H1Vltg3Wapeddell and Quechus13) released an All-in-one armor pack with a lot of armors but they missed some armor configs, so i fixed them and uploaded here, now let's see how to install this armor pack.

If you wanna watch the installation, click in this link :) https://www.youtube.com/watch?v=PxBRm6eAKXc


EFLC observation: I tried this method on EFLC with no success, game crash at loading screen, i believe that is not possible make this work on EFLC, i also tried the "exclusive" componentpeds.img and peds.ide files (C:\Program Files\Rockstar Games\EFLC\TBoGT\common\data\peds.ide) with same results, so you will have to replace normal peds, you can replace the ones that start with IG_ (mission chars) or CS_ (cutscene chars, this one i didnt tested), remember to edit the model name in the armor .ini file.


Check how to install version v1.1 or v1.2 here

  • Download the armor pack here, obs.: it includes Iron Man IV script v1.1 (last script version here)
  • Download the armor config fix here :)
  • Extract the files from armor pack to an folder
  • Copy all files from folder "Main files" to your gtaiv.exe folder and overwrite all (Obs.: This was not tested in EFLC, backup your EFLC install before trying)

  • If your GTA its with patch 1.0.4.0 or lower copy the DLL from folder "DLL for 1.0.4.0" to your gtaiv.exe folder and overwrite the old one
  • Open the "Fixed Armor cfg" zip an copy all files to your Armors folder (gtaiv.exe folder\Scripts\Iron Man files\Armors) and overwrite everything, it's interesting delete all files from that Armors folder before to avoid have duplicated armors, this is what you will have after this step:

  • Open the OpenIV, click in "Edit mode", open the folder models\cdimages then open file componentpeds.img, drag and drop all files from folder "Iron Man IV 1.1\Armors" to the OpenIV, the OpenIV will freeze for some seconds, it's normal because it's a lot of models:


You can use menu Edit > Add instead of drag and drop

Done, now open the game and see if a ton of armors appeared in the Armors menu ^^


Depending on your resolution you will not be able to see all lines :(
*This is my screen with resolution of 1680x1050

Friday 24 May 2013

Iron Man IV update v1.1 and source code


This is my first update for script Iron Man IV. Did some fixes and improvements, added new HUD (by wapeddell), back thrusters feature, etc..

Download it here (update only, last version always will be here first)
Check how to install version v1.1 or v1.2 here
Download the All-in-one pack here, it includes a lot of armors with all settings needed for GTA IV (not EFLC) :)

Vid about this update: https://www.youtube.com/watch?v=MNvMAYtfaHc

Basic installation (for who already have the version 1.0):
Extract the files from the Zip into your GTAIV.exe folder, you will have those files after extraction (highlighted):
If you use patch 1.0.4.0 or lower you need to copy DLL from folder "DLL for 1.0.4.0" to GTAIV.exe folder and overwrite the previous.

Installation guide and controls description (Installing script, animations and armors that goes with version 1.0):
http://gtaxscripting.blogspot.com/2013/04/script-iron-man-iv.html

Installing new armors:
http://gtaxscripting.blogspot.com/2013/05/iron-man-iv-installing-new-armors-step.html

Adding armors without replace game peds ( have some side effects :( ):
http://gtaxscripting.blogspot.com/2013/05/iron-man-iv-adding-new-armors-without.html

New armors:
http://gtaxscripting.blogspot.com/2013/05/iron-man-iv-new-armors.html

Possible problems and possible solutions:
http://gtaxscripting.blogspot.com/2013/04/iron-man-iv-possible-problems-and.html


Almost all changes:

  • Did some improvements related to performance and script errors
  • Added support for two new custom HUD's (by wapeddell)
  • Added flight collision option
  • Added crash effect for landing
  • Added new type of cannon, just more powerful and with different offset, to initially be used with Hammer Drone model by wapeddell
  • Added missile alarm HUD (HUD v2 and v3)
  • Added low health HUD indicator (HUD v2 and v3)
  • Improved enemy rockets flight and lock point
  • Fixed player model shake when moving and aiming at low speed flight
  • Fixed water bug that happens when you fall in water when in flight, causing an bug in camera making it look to the ass of the player when aiming ^^
  • Fixed error for missing files, now the missing files will be ignored
  • Fixed "look behind" function, now you can look behind (commonly triggered with key C) without having that weird camera movement
  • Fixed chest repulsor beam position
  • Fixed hand repulsor beam position
  • Fixed fast rotation behavior when activating flight, now player will turn until reach camera direction
  • Fixed bug that makes close car disappear when activating flight
  • Added roll for turns when in flight at mid/high speed
  • Removed automatic flight turn off when getting close to ground, now it will turn off when close to ground and with big speed decrease detected
  • Improved wanted level increase, now increases only when really firing and when there are cops close
  • Improved cops detection, now will detect cops and add small blips to them only when armor is equipped
  • Improved weapon heat (cooldown time), now we can shoot more :)
  • Almost fixed unwanted melee movement after shooting, almost ^^

Probably i forgot something :P


People involved in this project:

JulioNIB - Script, some HUD parts and some sounds
H1Vltg3 - Armors, HUD v1 and some tests
Wapeddell - Armors, HUD v2 and v3
Quechus13 - Armors


Download the source code here
enjoy this mess :)

Tuesday 14 May 2013

[TUT] Using custom Classes

I use classes basically when i need to add properties or methods to an game object, for example in Iron Man IV i use classes to control all the enemies or allies behavior (flight, shoot, target locking, etc.), in Heli Combat i use classes to make the Nightvision effect, it's very useful.

For example, let's say that we want get peds damaged by player and make them float for a while, each shoot will make them float for 1 second. We can create an simple class that holds the Ped, the time of float state, an trigger to start/increase the float state and the method that will make them float:


Here we have:
Public p as Ped = Nothing - this is the ped, i set = nothing to make sure that starts with nothing for the ped object, this is a Public property, it means that we can access it outside the class
Private float_time As Double = 0 - this is how much time the ped will float, an counter, its Private because i don't need to access it outside the class
Public Sub New(tPed As Ped)
    p = tPed
End Sub 
Here i set the method that will be called when a new instance of this class is created, i receive as param the Ped that will float
Public Sub startFloat()
    float_time += 1000
End Sub
 
Here i set the method that will increase the float time when the ped was damaged by player
Public Sub Tick()
    If float_time > 0 Then
        float_time -= myInterval
        p.Velocity = Vector3.WorldUp
    End If
End Sub
 
This is the Tick of the class, will be called at each tick of the script to make the float happens

One important detail, inside the Tick method i use the variable  myInterval, i had to declare this variable as an Shared variable in the script to be able to use it inside the class:


So to use an method or variable that is outside the custom Class we need to declare this method or variable as Shared instead of Public or Private.

Now to make it work i need to check for peds around player, check if they was damaged by player then add they to the List of objects of the custom class TFloatingPed, this list i called floatingPeds:


So in the tick of the script i will use an time counter to refresh the peds list at each 500 ms, then check if one of them was damaged by player and add to the list of floating peds, run the floating peds list and make them float:


With this class we can add an Blip object to it so we can create, change color, scale and destroy when we want just accessing the class instance, each class instance will have an blip object.

We can use this idea of classes in many cases, for example we can create an Rocket class, that will have an object that is the rocket, an Fly method that will make it fly and check for collisions, and we can create a lot of rockets and shoot them all and the tick of each class object will do the job (fly and explode on collision), i do this in Iron Man IV and Heli Combat, it's very useful.

I used this class idea in chainsaw script too, to create the blood drips on screen. Download the source code of chainsaw script here.

Download the project of this tutorial here.

Monday 13 May 2013

Iron Man IV - Adding new armors without replace any game Ped :)


Thx to Clark King now i know how to add armors without replace normal game peds, this is just perfect.


EFLC observationI tried this method on EFLC with no success, game crash at loading screen, i believe that is not possible make this work on EFLC, i also tried the "exclusive" componentpeds.img and peds.ide files (C:\Program Files\Rockstar Games\EFLC\TBoGT\common\data\peds.ide) with same results, so you will have to replace normal peds, you can replace the ones that start with IG_ (mission chars) or CS_ (cutscene chars, this one i didnt tested), remember to edit the model name in the armor .ini file.

Check how to install version v1.1 or v1.2 here


Know side effects:
Some users reported random planes appearing in some areas in city, i noticed some parts of an ship in some areas, its not big deal, it's just weird ^^
*Fix for the side effects: Install the armor pack that have all pedVariations.dat data for each armor or add the pedVariations data for each added armor.


Requirements:
  • Armor files: Will be in the armor download :P
  • OpenIV: To add the armors to componentpeds.img file 
  • Notepad: Yes, notepad to edit GTA peds.ide file
  • Default fragment object (download) - Some armors come without the .wft file, in this case you need this file
  • Iron Man IV script: Yeah, it's interesting have this small script too ^^, otherwise you will have to use console command spawn to see the added models. Download last version (v1.1) here

Video of idea being applied:
Check the New armors post here

In resume:
  • Edit file peds.ide (C:\Program Files\Rockstar Games\Grand Theft Auto IV\common\data) copy one of the game peds line and edit the model name to the desired model name
  • Rename the new ped model files to this model name
  • Use OpenIV to edit file componentpeds.img and insert this new ped model files
  • Edit armor .ini file changing name of model (model) and display name (name)
  • To have footsteps sound you need to create copies (one for each added armor :P) of the chosen game ped config in the file pedVariations.dat, example for the model of this tutorial:
im_crimson_dynamo, 5
#slot geometry BULK JOB SUNNY WET MAT1 RES1A RES1B RES2A RES2B AUDIO ID
feet, 0, 0, 0, 0, 0, 0, -1, -1, -1, -1, 2
head, 0, 0, 0, 0, 0, 0, -1, -1, -1, -1, 6
uppr, 0, 0, 0, 0, 0, 0, -1, -1, -1, -1, 1
uppr, 1, 0, 0, 0, 0, 0, -1, -1, -1, -1, 5
lowr, 0, 0, 0, 0, 0, 0, -1, -1, -1, -1, 11
end


Step by step:

Let's say that you downloaded this armor: http://www.gta4-mods.com/player/crimson-dynamo-f21609
You will have this ped files as default for this download:


now we rename to an name that we want, let's use im_crimson_dynamo:


Now we use OpenIV to insert this files inside componentpeds.img, now comes an important thing, this armor don't come with an "fragment object" file (ends with .wft), so we can copy one from another ped, rename to the new model name then add to componentpeds.img too, this is very important. In the end we will have this files imported with OpenIV:


In case you can't find this .wft file, you can use this one, just rename it like you did with the other armor files.

Ok, now we need to edit the Armor .ini file, go to folder {GTA.exe folder}\Scripts\Iron Man files\Armors and copy armor_2.ini, rename to an desired name, let's use armor_crimson_dynamo.ini:


Now open this file with an text editor (notepad is good option ^^) and edit model to the name that we choose before: im_crimson_dynamo
Also change name to desired name, for example: Crimson Dynamo


Save and close.

Now, very important part, let's edit the file peds.ide and add lines for this new armor (ped) name. Go to your GTAIV.exe folder (commonly "C:\Program Files\Rockstar Games\Grand Theft Auto IV") then go to folder common and then folder data, find the file peds.ide right click it, click in properties and uncheck the read only option:


Now open this file with an text editor like notepad and insert this line after the line that starts with: M_Y_Tourist_02,


im_crimson_dynamo, null, CIVMALE, move_player, GESTURES@MALE, GESTURES@M_PHONE, FACIALS@M_HI, visemes@m_hi, 0, move_player, null, -1,-1, PED_TYPE_PLAYER, VOICE_PLY_CR,   VOICE_PLY_CR  

The result is something like that:


As you can see what changes basically is the first name, there we put the name that we choose before to be the name of the new ped model.

Now its just save and close the peds.ide file and test the mod in the game :)


Know issue: They don't have foot steps, maybe is something related to the line that i choose to copy in peds.ide file.


Thx again to Clark King for the tip :)

Sunday 12 May 2013

[TUT] Using NAudio to play sounds - Very good, play more than one sound at same time :)

Hohoho, that's nice, thx to my friend TheVideoVolcano and to NAudio developers now i can play simultaneous sounds in my scripts, and you too :)

What we need is this beautiful DLL: NAudio

The code it's very simple:


We need to add Naudio.dll as reference in the project and paste one copy of this file in the GTAIV.exe folder

Other interesting features is:

Control Volume:

original volume is 1.0, we can reduce or increase it:
wc.Volume = 0.1
Wait(500)
wc.Volume = 2
Wait(500)
wc.Volume = 1
Skip seconds of audio:
wc2.Skip(1)
Seek to determine playback start in audio data
wc2.Seek(100000, SeekOrigin.Begin)

Download the sample project here, remember to put NAudio.dll inside gtaiv.exe folder, or you will obtain error when calling the methods :)

Thursday 9 May 2013

Iron Man IV - New armors

Let me group here the new armors that are coming.

Download last version of Iron Man IV (v1.1) here (recommended)
Check how to install version v1.1 or v1.2 here
Download the All-in-one pack here (almost all armors released with/after Iron Man IV script)
Check how to install the armors here (replace method, more indicated)
Check how to add armors without replace game peds here (have some side effects)

Models by H1Vltg3wapeddell and Quechus13

Tony Stark (by wapeddell*NEW
This one will replace Niko's head with Tony Stark (Robert Downey Jr.) head


Iron Man Mark VIII (by H1Vltg3*NEW


Iron Man Mark XXVI "Gamma" (by H1Vltg3*NEW


Iron Man Mark XXII "Hot Rod" (by wapeddell and H1Vltg3*NEW


Iron Man Mark XXX "Blue Steel" (by wapeddell and H1Vltg3*NEW


Iron Man Mark XXXVI "Peacemaker" (by H1Vltg3*NEW


War Machine (v2 ???) (by H1Vltg3*NEW


Classic Iron Man Mk1 & Mk2 (by Quechus13*NEW


Iron Man Mark IV and VI (by H1Vltg3*NEW


Iron Man Mark V (by H1Vltg3*NEW


Crimson Dynamo (by H1Vltg3)


Thumper (by H1Vltg3)


Igor (by H1Vltg3)


Hammerhead (by H1Vltg3)


Red Snapper (by H1Vltg3)


Shotgun (by H1Vltg3)


Iron Patriot (by H1Vltg3 and wapeddell)


Asgardian Destroyer (by Quechus13)


Hammer Drone (by  wapeddell)


Living Laser (by  wapeddell)